
Drupal CKEditor Setup & Development Tutorial
We’re going to show you how to make a perfect, responsive, touch-screen compatible WYSIWYG experience for Drupal using CKEditor. We’ll cover everything from basic setup to conditional presentation, advanced theming, and plugin development.
Table of Contents
Part 1: Introduction
Part 2: Basic Installation and Setup
Part 3: User Input
- Controlling what users can insert
- Configuring the styles dropdown
- Set up a file manager for uploading images and files
Part 4: Styling CKEditor
- Anatomy of CKEditor and styling patterns
- Theming typography and global elements
- Unique pages
- Contextual Theming
- Example: Add contextual classes using Javascript
- Example: Add contextual classes using PHP
Part 5: CKEditor Plugin Development
Part 6: Troubleshooting
Part 1: Introduction
What you'll need
- Drupal 7 (this works with Drupal 6 as well, but this guide will reference drupal 7)
- CKEditor Module: https://www.drupal.org/project/ckeditor
- optional: IMCE: https://www.drupal.org/project/imce
- optional: IMCE Mkdir: https://www.drupal.org/project/imce_mkdir
- optional: IMCE Crop: https://www.drupal.org/project/imce_crop
- optional: Block Class: https://www.drupal.org/project/block_class
- optional: Node Class: https://www.drupal.org/project/node_class
Why is this setup the best?
We review Drupal WYSIWYG modules roughly once a year. The standalone CKEditor module (not the WYSIWYG module) is still our favorite choice.
- It provides all the tools we need to create a true, 1-to-1 WYSIWYG experience.
- When properly set up, users can’t generate poor layouts.
- It works on touch screen devices like tablets and smart phones.
- We can provide different toolbars and experiences to different types of users.
- We need the ability to pass a custom config.js file to CKEditor without directly modifying any modules or libraries.
- We like the customization options the standalone module provides, like the toolbar management options and color scheme configurations.
- If you want a comprehensive guide for using CKEditor with the WYSIWYG module, try this instead: http://fuseinteractive.ca/blog/wysiwyg-module-ckeditor-taming-beast
Part 2: Basic Installation and Setup
Download and Install the CKEditor Drupal Module
Download the standalone CKEditor module https://www.drupal.org/project/ckeditor and unpack the contents to sites/all/modules/ckeditor the same way you would install any other module (https://www.drupal.org/documentation/install/modules-themes).
Establish your initial configuration
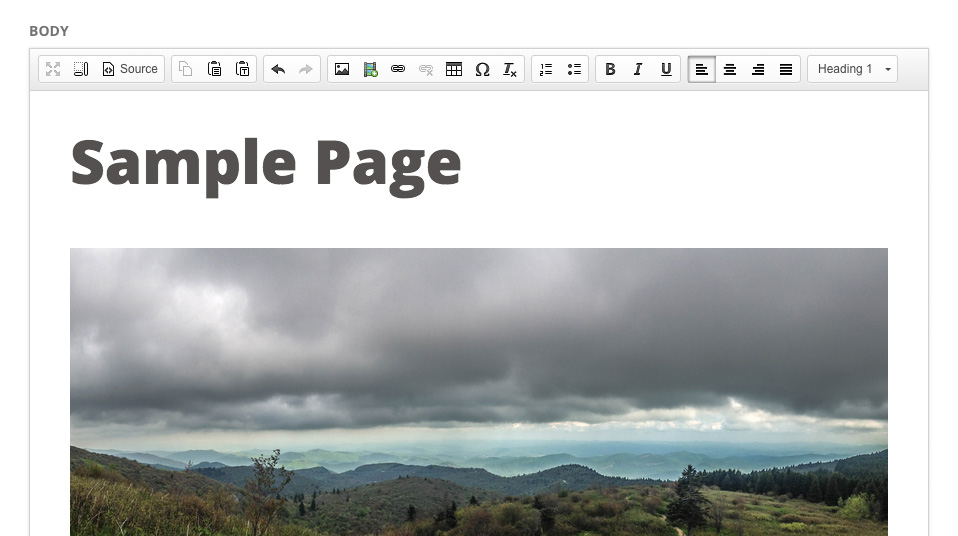
Once the module is enabled, visit the administration page (admin/config/content/ckeditor). The module provides you with 2 default profiles, and a global one. We recommend deleting one of the profiles and focusing on the remaining one during initial setup.
Edit the profile you wish to keep. As always, you’re free to set this up as you see fit. Here’s a list of options we think are significant, what we choose, and why.
Basic Setup: Text Formats
Here, we select text formats that support HTML. CKEditor operates poorly on plain text fields. If you are unfamiliar with text formats, we suggest exploring those settings after you’ve set up the editor. Text formats govern how user input is filtered and displayed. It’s important your text format supports the HTML elements you’ll be allowing in this CKEditor profile.
Editor Appearance: Toolbar
We find that giving users fewer options here results in more consistent, quality layouts. This is especially true for responsive websites. We omit the font size, color, and face selectors.
Advanced Content Filter
We set this to disabled. Instead of filtering markup at this step, we’ll filter all of the user’s input using a text format, so we can keep that logic all in one place.
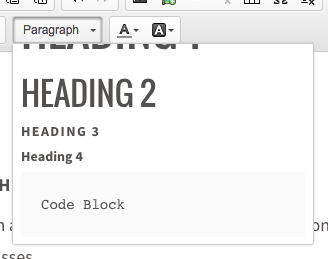
Cleanup and Output: Font Formats
The elements you declare here will appear in the “formats” dropdown box of the CKEditor interface. We generally limit these to a smaller set: p;div;h1;h2;h3;h4.
CSS
Point the CSS file path to your theme’s master CSS file. If your theme uses several CSS files, consider making an aggregated file specially for CKEditor, that uses @imports to merge all your CSS into a single file. Optionally, point the predefined styles path to a file in your theme’s directory. We’ll talk about setting up predefined styles later in the article.

File Browser Settings
You can set up a file browser to work with CKEditor here. We’ll cover setting up IMCE later on in the guide.
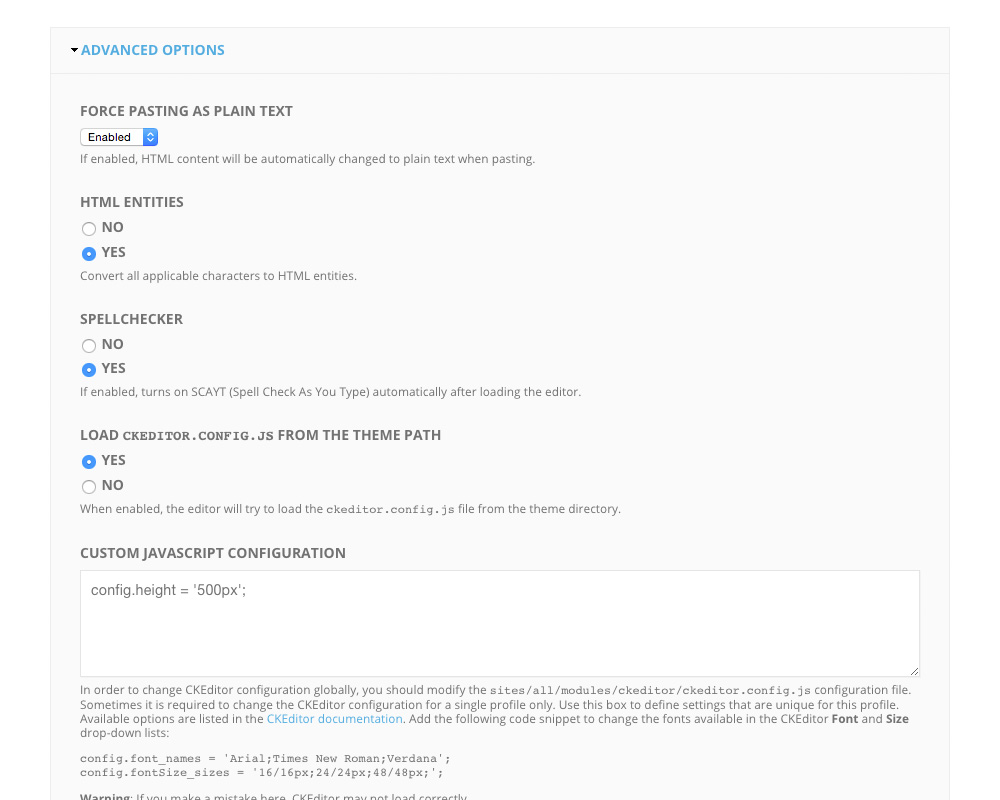
Advanced Options: Force pasting as plain text
We enable this, it’s the best way to ensure word processors don’t smuggle in a bunch of inline styles when the user pastes into the editor window.
Advanced Options: Spellchecker
We enable this, it’s actually really nice and works well. Native Mac OS X spell checking doesn’t work in CKEditor.
Advanced Options: Load ckeditor.config.js from theme path
We enable this, we’ll use this file later for advanced theming
Custom Javascript configuration
We don’t like how small the editor window is by default, so here we provide an initial height using: config.height = '500px';
Test and make sure it’s working
Visit a node form or block form with a text field that has configurable input formats. Make sure the input format is set to the one you paired CKEditor with. Ensure CKEditor is bound and running properly. If not, visit the common problems section below.
Part 3: User Input
Controlling what users can insert
It’s vitally important to control the HTML your users are allowed to pass into CKEditor. For a site that only has administrator accounts, this isn’t a big deal and you can probably ignore this section. However, if you’ll be using CKEditor on comment boxes or public-facing areas, it’s important to lock down what users can insert.
Turn off the advanced content filter in your CKEditor profile, and instead use text formats.
Even if CKEditor can remove malicious code client-side, we don’t want to rely on it as users can easily bypass client side limitations. Instead, we suggest filtering all user input server-side using a properly configured text format (input formats in Drupal 6).
Enable “Limit allowed HTML Tags” for untrusted users
Visit the configuration screen for the text format associated with your CKEditor profile. Check the “Limit allowed HTML tags” box, and you should see a new vertical tab appear at the bottom of the form, where you can declare allowed HTML tags. We like to keep this list very small: <div> <a> <h1> <h2> <h3> <h4> <p> <ul> <ol> <li>
Add rel=“nofollow” to all links
This is a good practice to deter spam link generation. If you leave this off, and a bunch of robots spam all over your site, Google may penalize you
Don’t allow public users to post <script> tags
This is the only serious one you need to worry about. Never allow untrusted users to post script tags, otherwise they could hijack accounts using a Cross Site Scripting (XSS) attack.

 Configuring the Styles Dropdown
The styles dropdown allows users to manipulate the DOM beyond the included toolbar set. It’s an effective way to work with site-specific CSS rules like custom classes.
1. Clone the default styles configuration file into your theme
Copy the default CKEditor styles configuration file under /sites/all/modules/ckeditor/ckeditor.styles.js (or wherever you installed the module), and place it somewhere in your frontend theme directory (sites/all/themes/my_theme/ckeditor.styles.js) or whichever theme is associated with the CSS file you’re supplying to CKEditor.
2. Enable the Styles toolbar item
Configure your CKEditor profile, and make sure the “Styles” toolbar element is enabled. Do this by dragging the button from “Available buttons” to “Current toolbar”.
3. Define the configuration file path
While configuring your CKEditor profile, under the CSS fieldset, make sure to define the location of creditor.styles.js file that we established in step 1 (sites/all/themes/my_theme/ckeditor.styles.js).
4. Modify the configuration file as needed.
The configuration file includes tons of examples you can use to create a great editing experience.
Example: Give elements a special class+element combination
In this example, we create a styles option which wraps selected text in a <p> tag with the class of "subtitle"
Config Line:
{ name : ‘Custom Subtitles' , element : 'p', attributes : { 'class' : 'subtitle' } },
Editor Output:
<p class="subtitle">Whatever text the user selected</p>
Set up a file manager for uploading images and files
We’re not pleased with the file manager options currently available for CKEditor. CKFinder is promising, but the license fee is a barrier given Drupal’s free model. elFinder is nice and pretty, but is currently not compatible with CKEditor in standalone mode.
Our best recommendation is IMCE, even though it looks very “vintage”.
Download, install, and enable all the IMCE modules
- https://www.drupal.org/project/imce
- (optional) https://www.drupal.org/project/imce_mkdir
- (optional) https://www.drupal.org/project/imce_crop
- (optional) https://www.drupal.org/project/imce_rotate
Configure your IMCE settings
Visit /admin/config/media/imce. We’re given 2 profiles to start with. Generally, I remove 1 to eliminate points of failure. Make sure your user roles are bound to the remaining IMCE profile. Don’t give everyone access, just the users you want to allow file upload access via this tool.
Profile Configuration: Disable the file browser tab in user profile pages
Uncheck this unless you want a global file browser under each user’s page (which is an awkward place).
Profile Configuration: Make sure directories are set up properly
<root> here refers to your files folder (sites/default/files). We don’t like users having access that far up, so we generally give them access to a subdirectory, like <root>/wysiwyg, which translates to sites/default/files/wysiwyg
Set IMCE as the file browser in your CKEditor profile
In your CKEditor profile, under the “File Browser Settings” fieldset, select IMCE as the file browser type for whichever dialogs you want to use. For us, we set it as all 3

Make sure the toolbar button is enabled
The link toolbar button will throw the “Link Dialog Window” which will have an action to upload files. The image toolbar button will behave similarly, but with images.
Go test it out
Visit an instance of CKEditor, and use the link or image buttons. You should see a “browse server” button in the modal window. Clicking that should open IMCE in a popup window.
Part 4: Styling CKEditor
Anatomy of CKEditor
CKEditor is basically an iFrame, the body of which has the contentEditable attribute enabled. CKEditor is like a normal web page, with your content populated into the <body> element.
Understanding how your content is rendered in CKEditor versus in the frontend is key to successful styling.

Theming typography and global elements
Give CKEditor your master CSS file
In your CKEditor profile, make sure you’re giving CKEditor your master CSS file. We prefer this method, as it reduces the amount of work we have to do. Once enabled, your CSS file will be loaded into the iframe document which contains the editable <body> interface.
Declare your typography and global elements.
The CKEditor interface has no context associated with it. It’s just a <body> tag with your markup inside. Start by ensuring all your most common typography styles (like base font size, h1, h2, p, etc) are declared globally, usually at the beginning of your CSS file.
If your theme doesn’t support this you can add unique classes and IDs to CKEditor’s <body> tag (see below), which may help.
body {
  font-size: 14px;
  line-height: 14px;
}

h1 {
  font-size: 4.0em;
  line-height: 1.5em;
}

h2 {
  font-size: 3.0em;
  line-height: 1.5em;
}

p {
  font-size: 1.0em;
  line-height: 1.5em;
}

.subtitle {
  font-size:0.8em;
  letter-spacing: 0.04em;
}
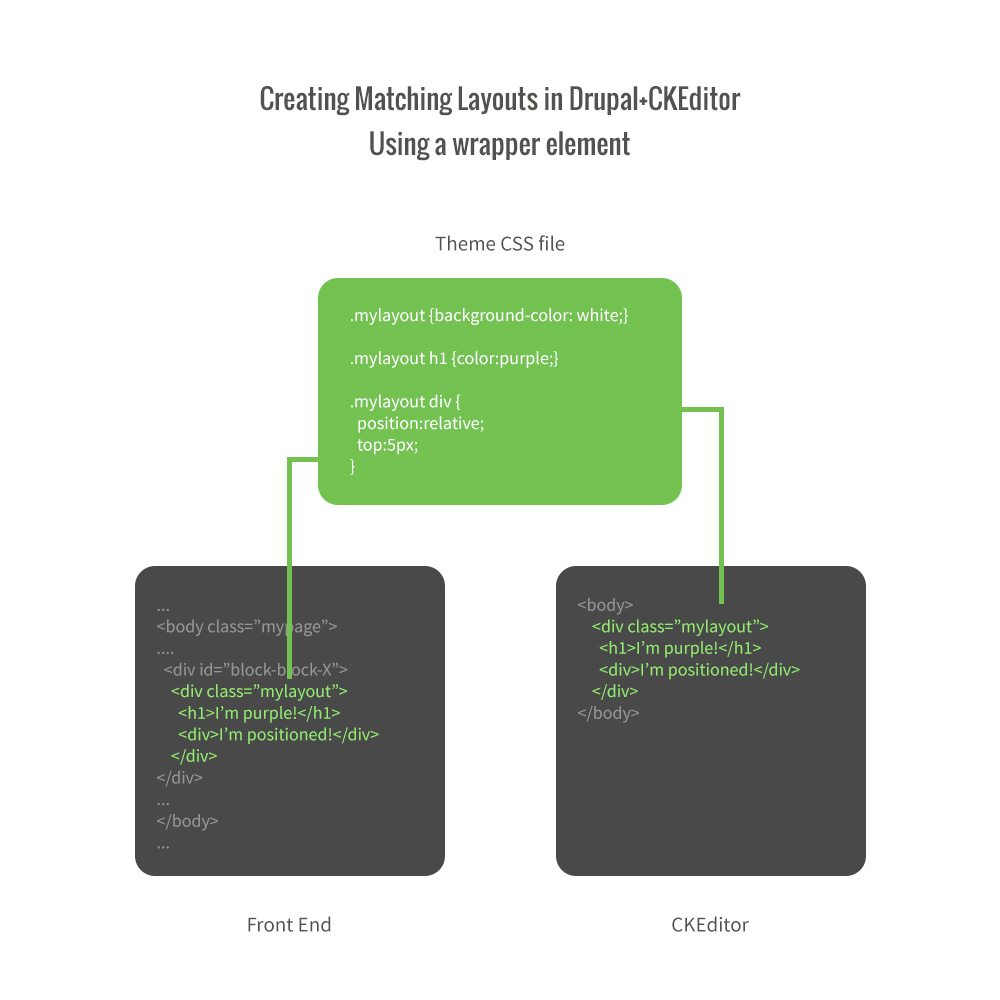
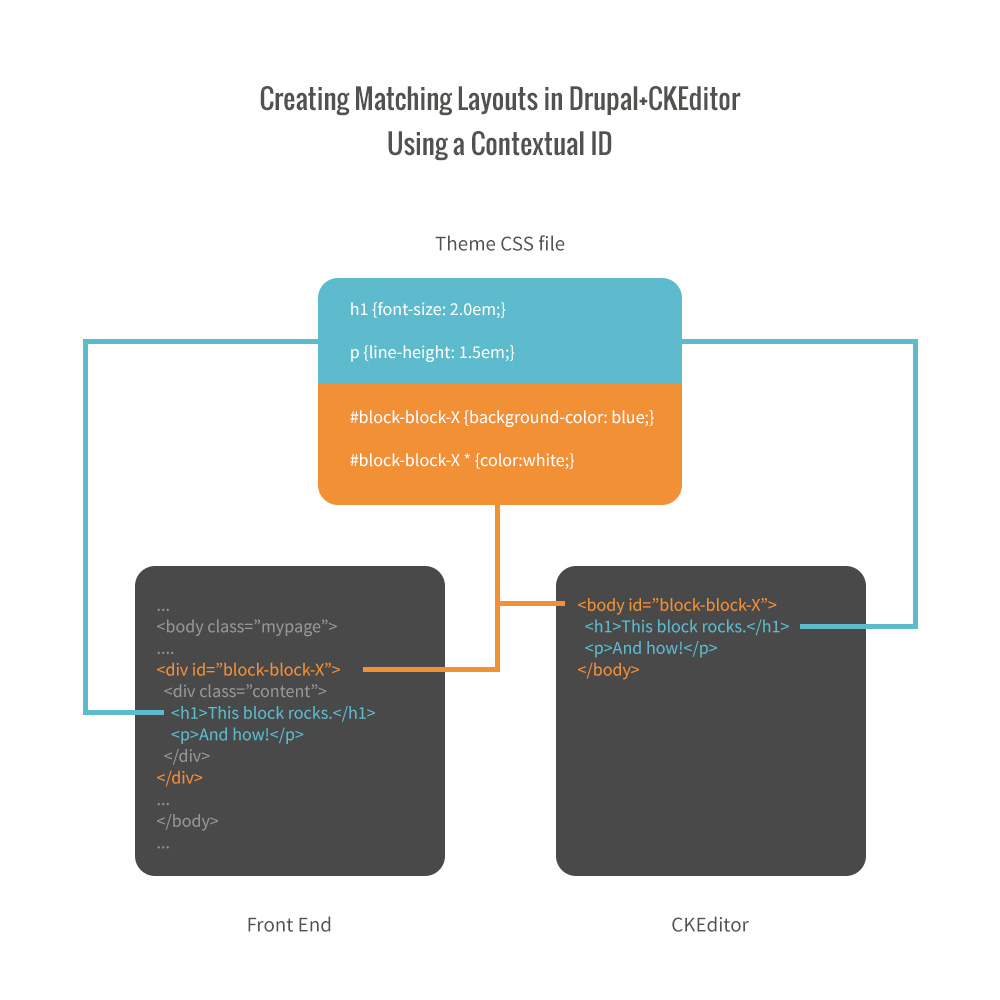
Unique Pages
Chances are, some of your pages have more advanced CSS attached to them. Maybe these pages have columns or floating regions that, while be cumbersome to create in CKEditor, still need a quality editing experience.
Style by a wrapper element
The easiest way to produce a quality editing experience is by styling off a parent DOM element that exists in both the editor window, and the front-end.
Adding a class to CKEditor’s body tag
If you need to write custom CSS rules that apply only to CKEditor, you can give CKEditor’s body tag unique classes and IDs using the ckeditor.config.js file. Make sure your CKEditor profile is set up to load ckeditor.config.js from your theme directory. Then, you can give the body a unique class/ID with the following directives:
config.bodyClass = 'ckEditor';

config.bodyId = 'myCKEditor';
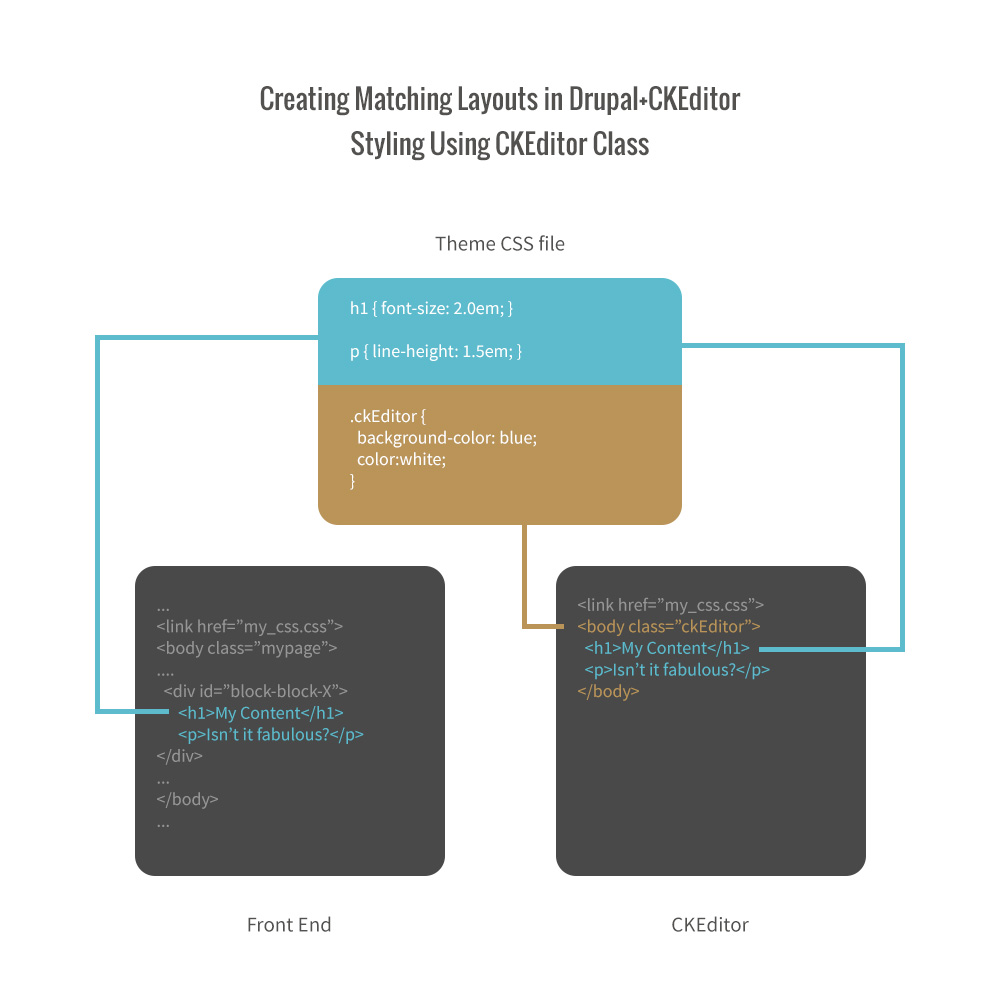
Contextual Theming
Since we can declare body classes and IDs for CKEditor via the ckeditor.config.js file, we can do it dynamically, based on the context of the editor. This is useful if we have an editing experience that changes depending on what you’re editing.
For example, say blocks in a particular region have inverted background and text colors. By default, CKEditor will use your global theme, and the inverted blocks will not have a true editing experience. You can help CKEditor out by passing conditional classes or IDs to CKEditor’s <body> tag, which can be used to write conditional CSS for those instances.
Example: Add contextual classes for regions, nid, and block ID using javascript
Here we’re using javascript to determine the context of the editor and apply a bunch of useful classes/IDs to CKEditor’s <body> tag. This would go in your ckeditor.config.js file. The name of our theme here is dough-frontend, so make sure you swap that out.
config.bodyClass = '';
config.bodyId = '';

//Parse out the URL
var url = window.location.pathname;
var url = url.split("/");
var context = "block";

var custom_class = '';
var custom_id = '';

if(
url[1] == "admin" &&
url[2] == "structure" &&
url[3] == "block" &&
url[4] == "manage" &&
url[5] == "block" &&
url[7] == "configure"){
  var context = "block";

  //Give the block id to the editor
  var custom_id = "block-block-"+url[6];

  //Determine which region the block is in
  var block_region = $("#edit-regions-dough-frontend option").filter(":selected").val();

  var custom_class = "bitcookie_region_"+block_region;

}

if(
url[1] == "node" &&
url[3] == "edit"){
  var context = "node";

  //Give the block id to the editor
  var custom_id = "node-"+url[2];

  //Determine which region the block is in
  var body_class = $("body").attr("class");
  var custom_class = "bitcookie_node "+body_class;

}

config.bodyClass = "bitcookie "+custom_class;
config.bodyId = custom_id;
Example: Add contextual classes using PHP
Similar to above, but here we’re using php to determine which classes to add to CKEditor’s body tag. You can follow this pattern to add IDs as well, or place the logic in functions other than hook_form_alter for different results.
In a custom module:
function myModule_form_alter(&$form, &$form_state, $form_id){
  $classes = array();
  $classes[] = "bitcookie";
  if(!empty($form['#node'])){
    $classes[] = "bitcookie_node_type {$form['#node']->type}";
  }
  $classes = implode(" ", $classes);
  drupal_add_js(array('myModule' => array('classes' => $classes)), 'setting');
}
In ckeditor.config.js
if(typeof Drupal.settings.myModule.classes != 'undefined'){
  config.bodyClass = Drupal.settings.myModule.classes;
}
Part 5: CKEditor Plugin Development
CKEditor plugin development is intense, we could devote a whole article to it. We’ll cover the basics on how to write CKEditor plugins as Drupal modules. For further reading, we suggest viewing CKEditors plugin documentation http://docs.ckeditor.com/#!/guide/plugin_sdk_sample_1
Manipulating Existing Plugins
CKEditor can be modified by a javascript file, so you can use a module to change the way things work. In the following example, we remove some options from the image and link dialog windows to simplify how they work.
Example: Modify link dialog window
In this example, we remove all the options from the link dialog window other than the URL field.
In your .module file
function myModule_init(){
  $module_path = drupal_get_path('module', 'myModule');
  drupal_add_js($module_path."/js/myModule.js");
}
In your module’s javascript file
(function ($) {

Drupal.myModule = {};
Drupal.behaviors.myModule = {};
Drupal.behaviors.myModule.attach = function(context, settings){

  if(typeof CKEDITOR != 'undefined'){
    CKEDITOR.on('dialogDefinition', function (ev) {
      // Take the dialog name and its definition from the event data.
      var dialogName = ev.data.name;
      var dialogDefinition = ev.data.definition;

      // Check if the definition is from the dialog we're
      // interested in (the 'link' dialog).
      if (dialogName == 'link') {
        dialogDefinition.minWidth = 200;
        dialogDefinition.minHeight = 50;

        // Remove the 'Advanced' tabs from the 'Link' dialog.
        dialogDefinition.removeContents('advanced');
        dialogDefinition.removeContents('target');

        // Get a reference to the 'Link Info' tab.
        var infoTab = dialogDefinition.getContents('info');

        // Remove unnecessary widgets from the 'Link Info' tab.
        infoTab.remove('linkType');
        infoTab.remove('browse');
        infoTab.remove('protocol');
      }
    });
  }

};

})(jQuery);
Creating Plugins
You can create custom toolbar buttons that inject HTML or interact with the editor in unique ways. In this example, we’ll be creating an ajax file/image upload plugin. The plugin will accept an image file from the user in a modal, then drop it into the editor window.
A plugin like this would be great for a wiki style site where users upload images directly into documents.

First, we’ll create a module with the following file/folder structure
bcCKEditorUpload/
  bcCKEditorUpload.info
  bcCKEditorUpload.module
  static/
    dialogs/
      bcCKEditorUpload.js
    icons/
      bcCKEditorUpload.png
  plugin.js
.module file: Add jquery.form library
We want the jQuery.form library to submit our upload form without a refresh. Invoke hook_init to add that dependency on every page load. For production, load this dependency only where it’s needed using hook_form_alter or another method.
function bcCKEditorUpload_init(){
  drupal_add_library('system', 'jquery.form');
}
.module file: Invoke hook_ckeditor_plugin
This hook notifies the Drupal CKEditor module about our new plugin. Here we’re declaring the plugin description, the folder path to plugin.js, and the location of the icon, amongst other things.
function bcCKEditorUpload_ckeditor_plugin() {
  $module_path = drupal_get_path('module', 'bcCKEditorUpload');
  return array(
    'bcCKEditorUpload' => array(
      'name' => 'bcCKEditorUpload',
      'desc' => 'Bitcookie Image Uploader',
      'path' => $module_path . '/static/',
      'buttons' => array(
        'bcCKEditorUpload' => array(
          'icon' => 'icons/bcCKEditorUpload.png',
          'label' => 'Bitcookie Image Uploader',
        ),
      ),
    ),
  );
}
Configure static/plugin.js
Plugin.js is another configuration layer that tells CKEditor about your plugin. Here we’re defining a new button and dialog window. Notice how we refer to another JS file which will control the behavior of our dialog/modal window.
CKEDITOR.plugins.add( 'bcCKEditorUpload', {
  icons: 'bcCKEditorUpload',
  init: function( editor ) {

      editor.addCommand( 'bcCKEditorUploadDialog', new CKEDITOR.dialogCommand( 'bcCKEditorUploadDialog' ) );

      editor.ui.addButton( 'bcCKEditorUpload', {
          label: 'Insert Image',
          command: 'bcCKEditorUploadDialog',
          toolbar: 'insert'
      });

      CKEDITOR.dialog.add( 'bcCKEditorUploadDialog', this.path + 'dialogs/bcCKEditorUpload.js' );

  }
});
Configure static/dialogs/bcCKEditorUpload.js
This file is doing a good bit of work. First, we’re declaring the dialog’s width, height, and DOM. Then, we declare a custom button called “Upload and Insert” which ajax-sends the file to our module’s page_callback, and returns the the DOM for the editor.
CKEDITOR.dialog.add( 'bcCKEditorUploadDialog', function( editor ) {
  return {
    title: 'Insert Image',
    minWidth: 200,
    minHeight: 50,
    contents: [
      {
        id: 'tab-basic',
        label: 'Basic Settings',
        elements: [
          {
            type: 'html',
            html: '<form id="bcCKEditorUploadForm" action="/bcCKEditorUpload/upload" method="post" enctype="multipart/form-data"><input name="files[bcCKEditorUpload-image]" type="file" id="bcCKEditorUpload_file" /> <p class="description">Select or Drag an image file to insert. Must be under 3MB in size and be a png, jpg, or gif format.</p></form>'
          }
        ]
      }
    ],

    buttons: [
      //You can show the default OK button and capture its click with a callback below
      //CKEDITOR.dialog.okButton,

      //Show the default cancel button
      CKEDITOR.dialog.cancelButton,

      //Declare a unique button
      {
         id: 'upload',
         type: 'button',
         label: 'Upload & Insert',
         title: 'Upload the image and insert it into the document',
         accessKey: 'C',
         className: 'cke_dialog_ui_button_ok',
         disabled: false,
         onClick: function(){

          var myForm = jQuery('#bcCKEditorUploadForm');
          var fileField = jQuery("#bcCKEditorUpload_file");

          //-------------------------------------------------------------------------------------------|
          //  Check that the user actually inserted a file
          //-------------------------------------------------------------------------------------------|
            if(fileField.val() == ''){
              alert("You must provide a file");
              return true;
            }
          //-------------------------------------------------------------------------------------------|
          //  End checking for actual file insertion
          //-------------------------------------------------------------------------------------------|

          //-------------------------------------------------------------------------------------------|
          //  Perform an AJAX file upload
          //-------------------------------------------------------------------------------------------|
            myForm.addClass("loading");

            myForm.ajaxSubmit({
              dataType: "json",
            	success: function(data){

            		myForm.removeClass("loading");

            		//Get the dialog
                var ckDialog = window.CKEDITOR.dialog.getCurrent();

                //-------------------------------------------------------------------------------------------|
                //  Catch errors
                //-------------------------------------------------------------------------------------------|
                  if(data.success != 1){
              		  var error_code = data.error_code;
                		alert("An error occured while attempting to upload the file: "+error_code);

                		//Close the dialog window
                    ckDialog.hide();


                		//Blank out the field
                		fileField.val('');

                		return true;
              		}
            		//-------------------------------------------------------------------------------------------|
            		//  End catching errors
            		//-------------------------------------------------------------------------------------------|

            		//-------------------------------------------------------------------------------------------|
            		//  Handle success
            		//-------------------------------------------------------------------------------------------|

            		  //Blank out/reset the field value for later use.
                  fileField.val('');

                  //Construct the insert DOM for CKEditor, we get this from the page callback in our .module file.
                  var element = CKEDITOR.dom.element.createFromHtml(data.html);
                  editor.insertElement(element);

                  //Close the dialog window
                  ckDialog.hide();

                //-------------------------------------------------------------------------------------------|
                //  End handling success
                //-------------------------------------------------------------------------------------------|

            	}
            });

            return true;

          //-------------------------------------------------------------------------------------------|
          //  End performing an ajax file upload
          //-------------------------------------------------------------------------------------------|
        }
      }
    ],

    onOk: function() {
      //If you enable the regular OK button, you can capture the click here.
    },

    onLoad: function() {
      var dialog = this;
      var dialogDom = dialog.getElement()
      dialogDom.addClass("bcCKEditorUpload-dialog");
    }
  };
});
Install and enable the module
- Enable the module as usual through Drupal’s module configuration page.
- Configure your editor’s toolbar and drag the new button into place.
- Be sure to check “Bitcookie Image Uploader” under Editor Appearance -> Plugins
Part 6: Troubleshooting
My changes aren't showing
CKEditor is notorious for holding onto browser caches. Before pulling your hair out, check your work in a fresh incognito window (chrome). Or, temporarily disable caching in your developer tools.
HTML is being manipulated or removed when the user saves. The DOM they provide in the CKEditor window is not the same as the DOM on the front-end.
There are 2 places where markup is filtered. The first is the advanced content filter under your CKEditor profile. We turn this OFF so we only have a single point of user input filtering. The other place where user input is filtered is the text format. Make sure the text format associated with your profile allows the HTML tags your user is trying to create.
I made changes to my CSS, but CKEditor is not showing them
First, make sure the correct path is provided in your config profile. You may need to explicitly define the location of the theme, rather than using the %t token. Then, try viewing CKEditor in a fresh incognito window (Chrome) to eliminate your browser cache as a potential issue. Or, disable cache via the developer tools.
CKEditor’s interface buttons are all torn, weird looking, or corrupt
Sometimes this happens after an update. Try viewing CKEditor in a fresh incognito window (Chrome) to eliminate your browser cache as a potential issue.
CKEditor is not showing, I see a regular text area
CKEditor will only bind to text areas with configurable input formats. Make sure your CKEditor profile is bound to the same text format that the textarea in question uses. Then, make sure your user account has permission to use that text format.
CKEditor is not showing, there’s a blank space where it should be.
Try viewing CKEditor in a fresh incognito window (Chrome) to eliminate your browser cache as a potential issue. If this doesn’t help, check for javascript errors and resolve them.
CKEditor isn’t showing changes to the styles dropdown
First, make sure the correct path is provided in your config profile. You may need to explicitly define the location of the theme, rather than using the %t token. Then, try viewing CKEditor in a fresh incognito window (Chrome) to eliminate your browser cache as a potential issue. Or, disable cache via the developer tools.
I can see my custom toolbar button, but when I click it nothing happens.
Check to make sure your plugin is enabled under your CKEditor profile -> editor appearance -> plugins